
If you teach a language online, most students decide in the trial lesson whether to stay. Getting them to that lesson is the hard part. A student finds you on Instagram or gets your name from a friend. Then they have to message you, wait for an answer, work out your time zone and agree on a time. Some give up at each of those steps.
A booking page removes those steps. The student opens one link, sees who you are, picks a free time in their own time zone and books. You get a notification instead of a week of messages.
This guide shows how to set one up for free on OwnSlides and what to do with the link once it exists.
What a good trial lesson page needs
A student deciding on a trial wants four answers, in this order:
- Who is this? A real photo, the language you teach and one line about how you teach.
- Is it for me? Who you usually teach, such as adults, beginners or exam students, and what a first lesson looks like.
- When can I go? Free times shown in the student's own time zone, not yours.
- What happens next? A confirmation, a reminder and a video link.
Scheduling tools answer the third question and skip the rest. A link-in-bio page answers the first two and has no calendar. The teacher page on OwnSlides answers all four on one page.
Step 1. Make the page
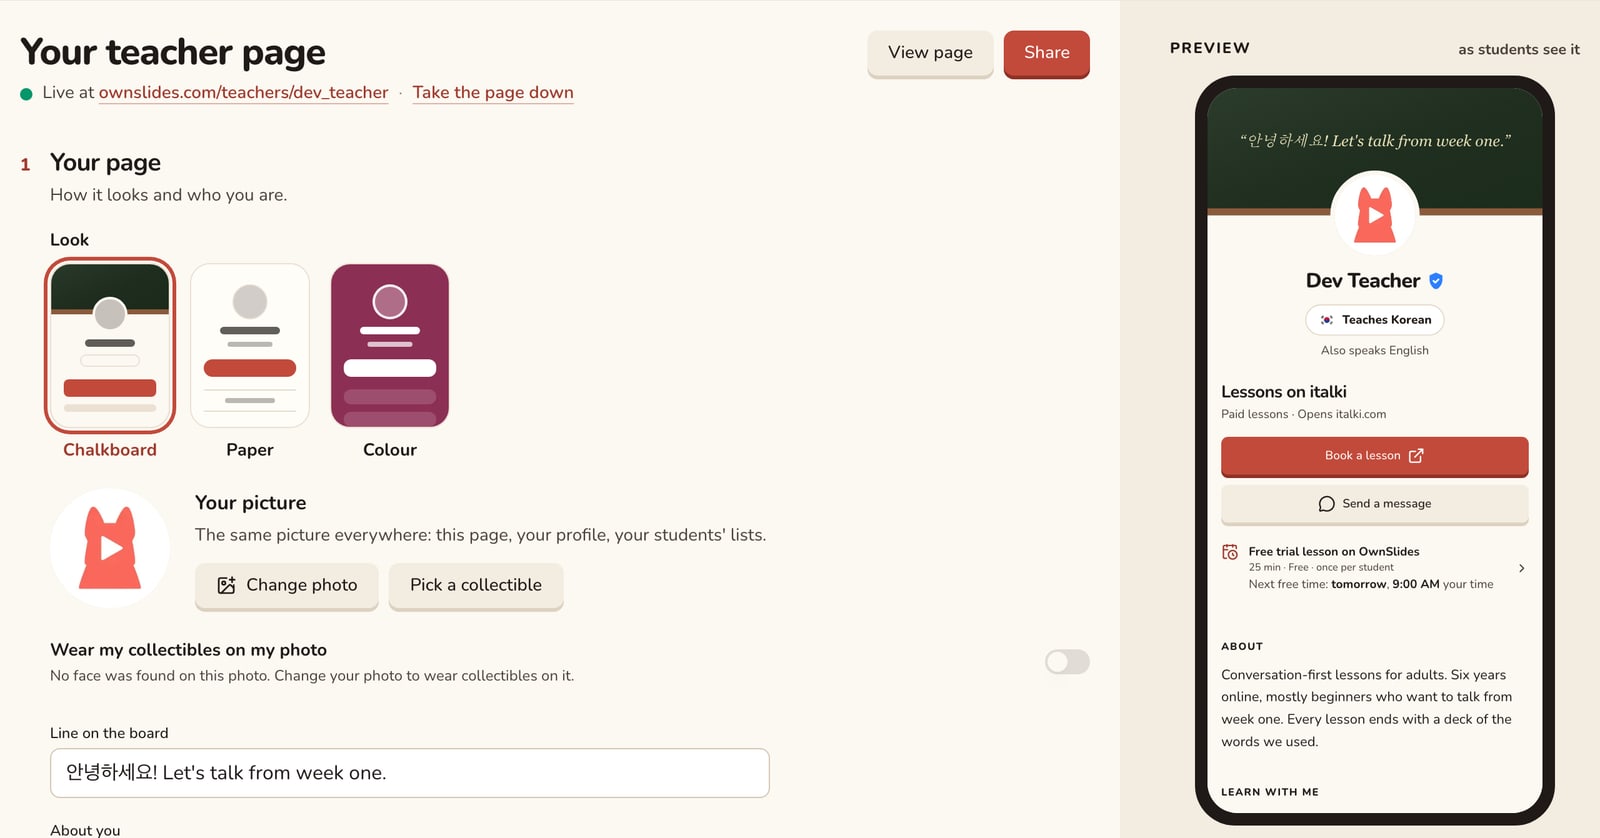
Sign up for a free account, open Create and pick Teacher page. The editor shows a checklist under Ready to publish:
- Your language, taken from your profile
- A picture, ideally a real photo of your face
- A way to book, which you set up in step 2
- A line about you
Write the About you text for one student, not for everyone. "Conversation-first lessons for adults who understand more than they can say" tells a reader in one line whether you are right for them. "I am a passionate teacher with ten years of experience" does not.
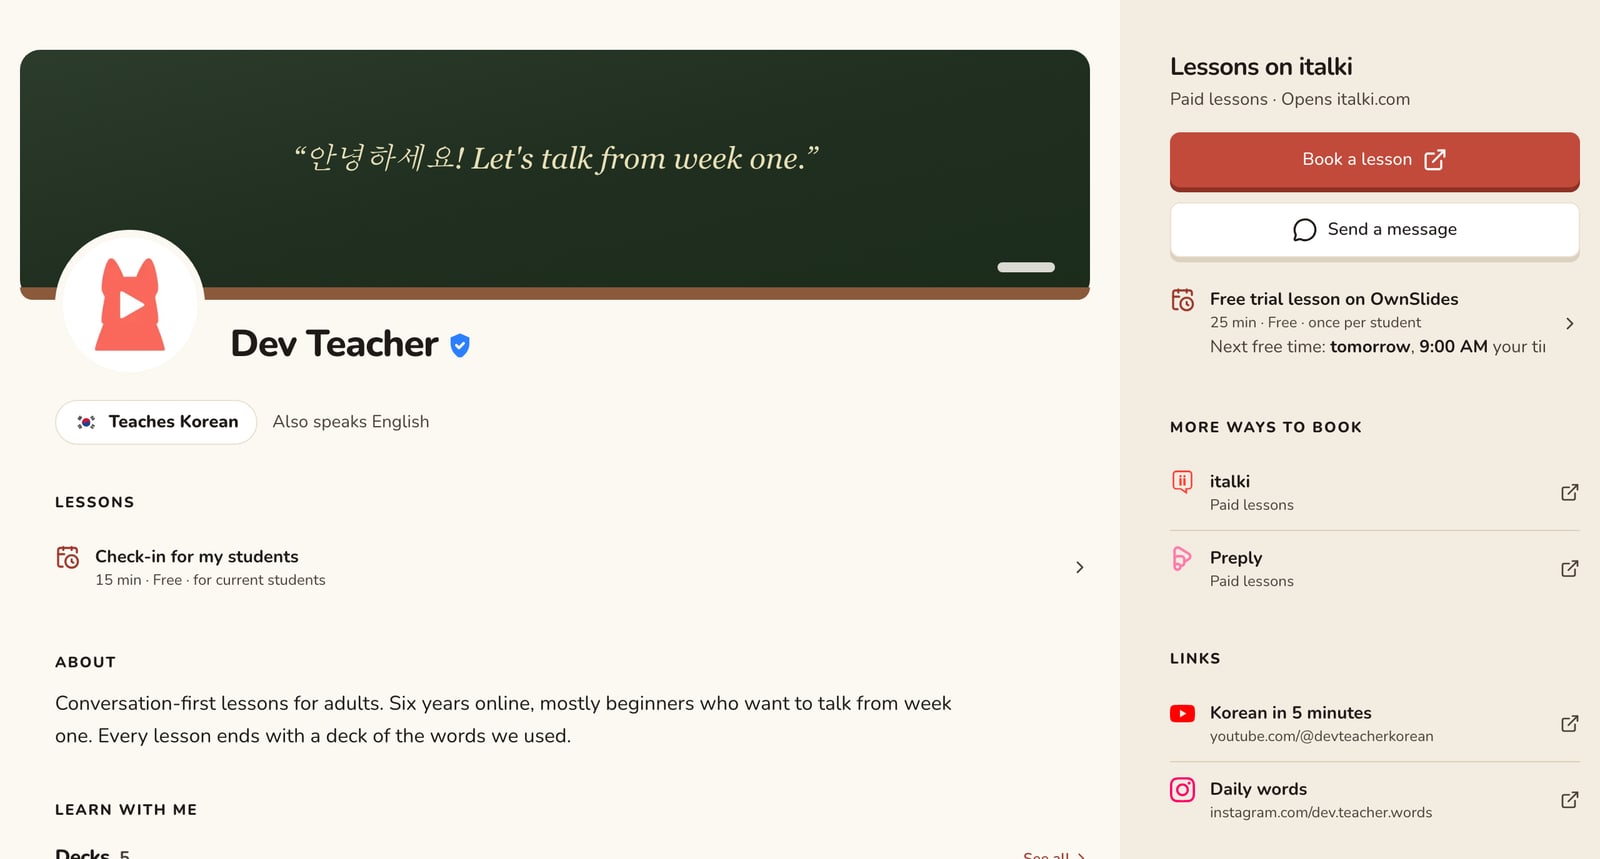
You can also pick a look for the page, either a chalkboard or paper in one of several colours. Then add a short line that shows on the board, like "Let's talk from week one."
Step 2. Set the lessons students can book
Under What students book, add a lesson type. A common setup for a trial is:
- Name: Trial lesson
- Length: 25 or 30 minutes
- Who can book it: Anyone
- Once per student: on, so each new student books one trial
You can add more lesson types later, for example a lesson that only your current students can book.
Students pay nothing for lessons booked on OwnSlides. If you also sell paid lessons on your own site, italki or Preply, you can point the page's main button there and keep the free trial as a second option. Step 5 covers this.
Step 3. Add your weekly hours
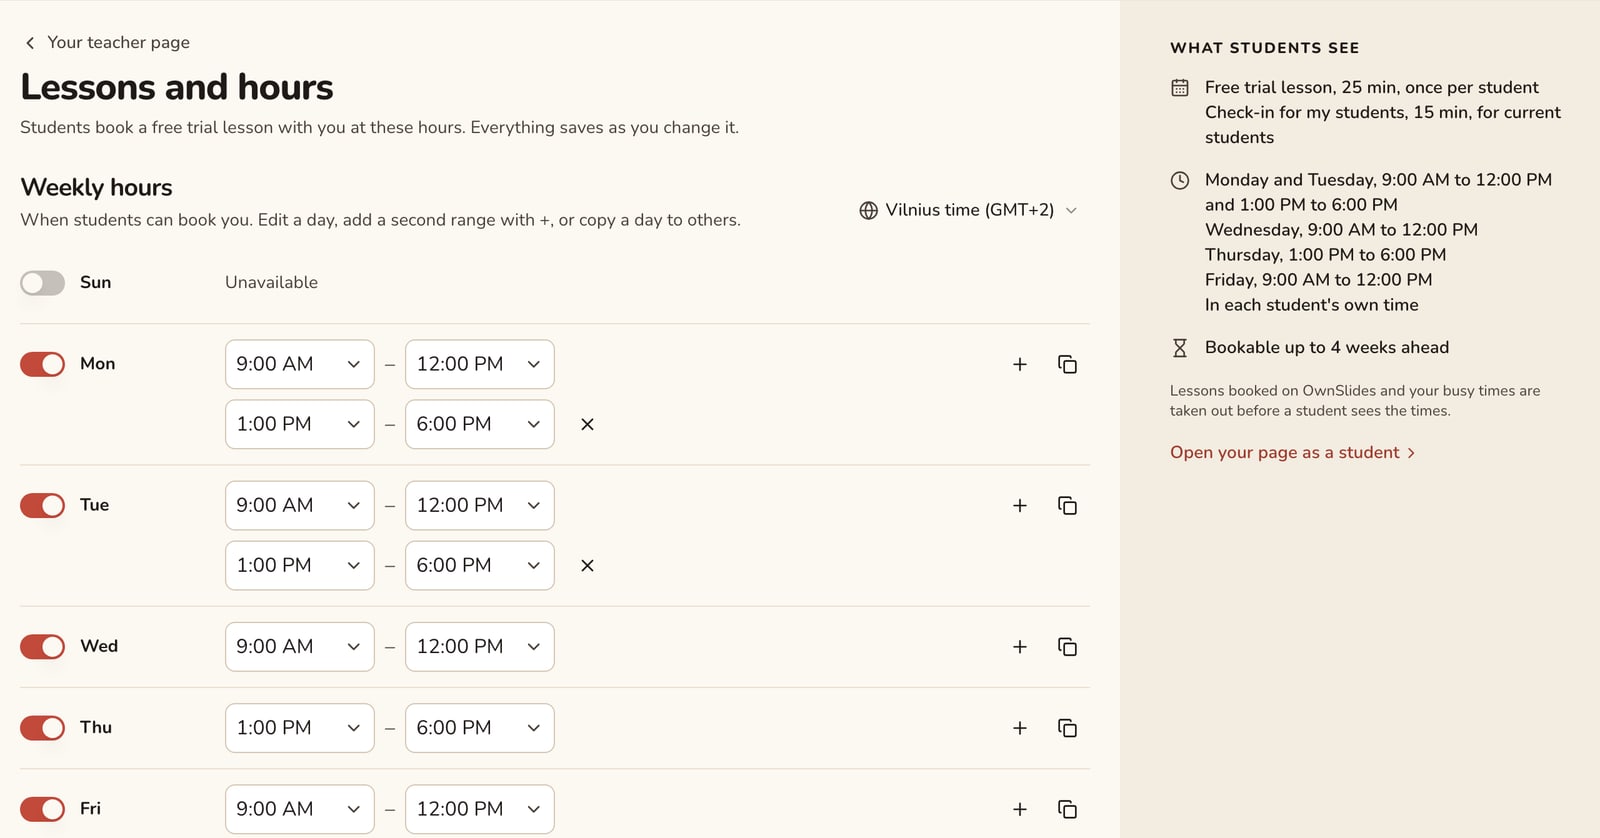
Under Weekly hours, set when students can book you. A day can have two ranges, such as a morning block and an evening block. You can copy one day's hours to the rest of the week and set your Time zone.
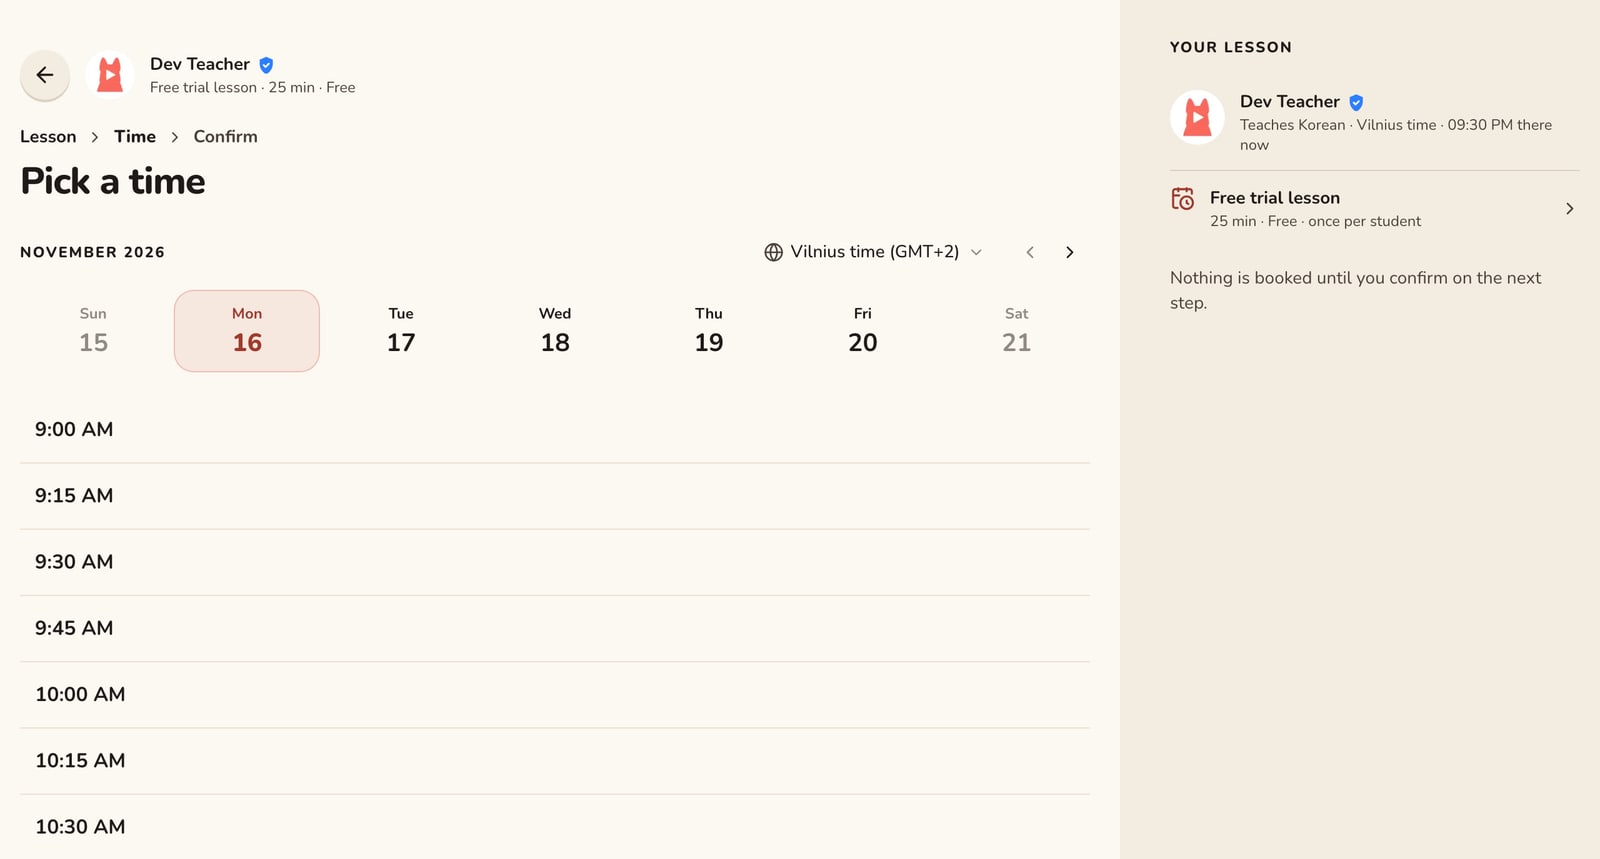
Students always see these times in their own time zone, with your local time next to it. International students no longer have to ask what 9:00 means for them.
Set two rules on day one:
- Book at least a few hours ahead, so nobody books a lesson that starts in ten minutes.
- Approve each booking, if you want to accept each new student yourself. With it off, OwnSlides confirms a booking straight away.
Step 4. Connect your video link and calendar
Under Lesson video, paste the link you already use, such as a Zoom, Teams or Google Meet room. Only a student with a booking sees it, and only until that lesson ends.
If you use Google Calendar, connect it. Two things change:
- OwnSlides stops offering the times you are busy in Google Calendar. It sees only that you are busy, never what you are doing.
- You can have a new Google Meet link made for each lesson, which only that student sees.
Step 5. Choose the main button
The big button at the top of the page is the first thing a visitor taps. You have three choices:
- Book a free lesson here, which opens your free times
- Open a link, for example your italki or Preply profile or your own booking site
- Message me, which opens a chat with you
If most of your income comes from a marketplace, put that link on the main button and keep the free trial underneath it. If you are building your own list of students, make the free trial the main button.
Below the button you can add your other links, like Instagram, TikTok, YouTube and your website. The page then works as your link in bio.
Step 6. Publish and share the link
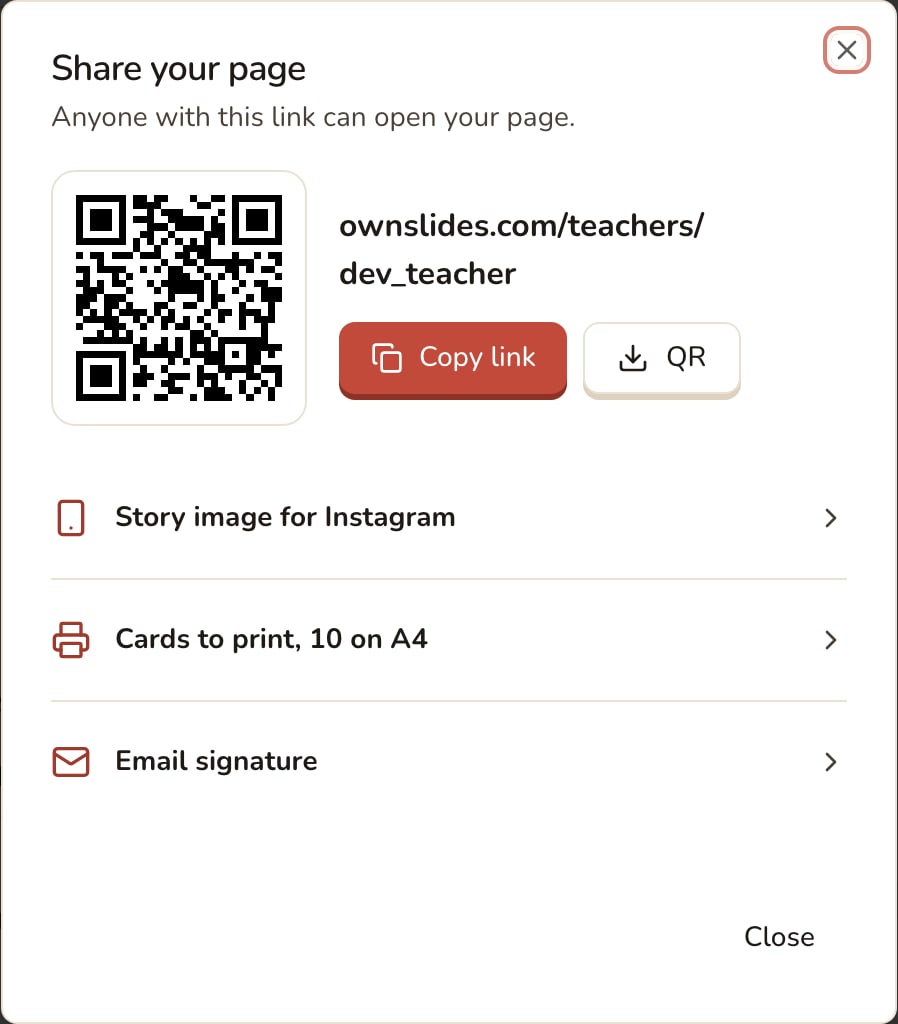
Press Publish page. Your page now has its own address, and the Share sheet has five ways to spread it:
- Copy link, for your bio and your messages
- QR, a QR code to download for a flyer or a slide
- Story image, sized for Instagram and WhatsApp stories, in your page's look
- Cards to print, ten business cards on an A4 sheet, front and back
- Email signature, to paste into your email app
You can also list yourself in the Teacher directory, where people looking for a teacher of your language can find you.
What the student sees
A student who opens your link sees your photo, your language, your About line and the main button.
They tap the trial lesson, pick a day and a time in their own time zone, and can add a note about their level or what they want to practise.
To book, they make a free account. They then get a confirmation, or a "request sent" message if you approve each booking yourself. They also get an Add to calendar button for Google, Apple or Outlook and a reminder an hour before the lesson. During the lesson, the video link is on the lesson page and in their notifications.
You get the booking right away, with their note, and the lesson appears on your schedule.
After the trial, give them a reason to come back
On the same page, under Learn with me, students see your public decks, notes, shorts and exercise sets. After the trial you can give a new student homework from those and see whether they practised before the second lesson. A student who has already practised with your material between lessons has a concrete reason to book again.
Quick checklist
- A real photo and a one-line About written for the student you want
- One trial lesson type, 25 to 30 minutes, once per student
- Weekly hours and your time zone, with a few hours' notice
- A video link, and Google Calendar connected if you use it
- The main button pointing where most of your students should go
- The link in your Instagram, TikTok and YouTube bios and in your email signature
Make your teacher page. It is free, and you can take it down at any time.